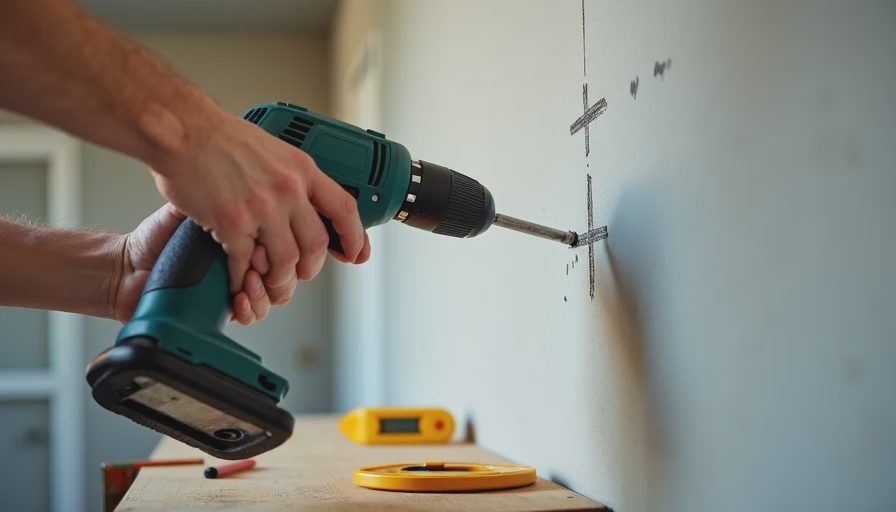
I think, you’re ready to hang a shelf, mount a TV, install a new outlet, or run conduit. Before the drill bit touches the wall, stop. In our 1989 house the walls have surprises — knob-and-tube remnants, old plumbing, and inconsistent framing. Rushing this step has cost homeowners thousands in repairs.
I drill into walls regularly for garage organization, shelving, and small upgrades. The 5-point checklist below takes less than five minutes and has prevented multiple near-misses.
The 5 Critical Checks Before Drilling
1. Locate Studs or Structural Members
Use a good stud finder (I prefer electronic ones with deep scan). Mark both edges of the stud. In older houses like ours, studs can be 16", 24", or inconsistent. Confirm with a finish nail test in a hidden spot if needed.
Why it matters: Screwing into the middle of a stud gives maximum holding power. Missing it means weak mounts that pull out under load.

2. Scan for Electrical Wires
Use a non-contact voltage tester on the surface and again after marking. Then use a wire detector or the stud finder’s AC wire mode. Pay special attention around outlets, switches, and light fixtures — wires often run vertically or horizontally from them.
3. Check for Plumbing Pipes
Especially important in kitchens, bathrooms, and exterior walls. Use a moisture meter or pipe detector if you have one. Listen with a stethoscope or just tap the wall and listen for hollow vs solid sounds. In our house the copper pipes sometimes run in unexpected places.
4. Verify Wall Type and Cavity Conditions
Drywall over stud? Plaster? Exterior wall with insulation? Cinder block in garage? Each requires different anchors and drilling technique. Knock on the wall and listen. Measure thickness if possible.
5. Review the Load and Purpose
How much weight will this hold? Dynamic load (TV mount) or static (shelf)? Is it in a high-traffic area? This determines not just where but how you fasten — toggle bolts, heavy-duty anchors, or direct into studs.
Follow the procedure and everything will be fine.
I once skipped the voltage check while mounting a garage shelf. The tester was on the other side of the garage. Fortunately I only nicked the insulation on a wire and caught it immediately. Now the tester lives in the prime spot on the tool wall.
Tools You Actually Need for Safe Drilling
Keep this small kit together:
Electronic stud finder with wire detection
Non-contact voltage tester
Flashlight or headlamp
Measuring tape and pencil
Painter’s tape (for marking safe zones)
Appropriate drill bits and anchors for the job
Safety glasses and dust mask

Budget for quality detection tools: $35–$85 total. Cheap stud finders lie. Good ones pay for themselves on the first major project.
Step-by-Step Drilling Procedure
Once the 5 checks are complete:
Step 1: Mark your hole locations clearly with painter’s tape and pencil. Double-check measurements.
Step 2: Re-scan the exact spot with voltage tester right before drilling.
Step 3: Drill slowly with light pressure at first. Feel for resistance changes. If you hit something unexpected, stop immediately.
Step 4: If going into a stud, use appropriate wood screws. For hollow areas, use correct anchors rated for your load.
Step 5: Vacuum dust immediately and inspect the hole with flashlight.
In the garage I mounted my main tool wall this way. Every single lag screw went exactly into studs because I followed the checklist. The system has held hundreds of pounds of tools for years.
Common Failure Modes When You Skip Checks
Hitting live wire → tripped breaker or worse (fire risk)
Drilling into water pipe → immediate leak inside the wall
Missing studs → shelf or TV pulls out months later
Hitting gas line (rare but catastrophic in some older homes)
Creating oversized holes that require bigger patches
If you ignore these checks, three months from now you might be opening the wall for expensive repairs.
Megan walked into the garage once while I was marking stud locations with the finder and asked why I was being so methodical about “just hanging some hooks.” I showed her the voltage tester lighting up near an outlet. She stopped asking after that.
Special Considerations for 1980s Houses
Our house has some quirks:
Possible knob-and-tube wiring in untouched areas
Polybutylene plumbing in some spots (check yours)
Inconsistent insulation
Multiple layers of drywall or plaster repairs

When in doubt, open a small access hole or call a pro. For garage and non-living area walls I’m more aggressive with DIY. For main living spaces I’m extra cautious.
Building the Habit
Print or laminate the 5-point checklist and keep it near your drill. After a few projects it becomes automatic. The whole process takes under five minutes but saves hours or days of headache.
Next time you need to put something on a wall, resist the urge to just grab the drill. Run the checklist. Mark carefully. Drill confidently.
Measure first (locate hazards and structure), then cut (drill the hole). This single habit separates clean professional-looking installs from patched-and-repaired disasters.
Your walls will stay intact, your projects will stay on budget, and you’ll sleep better knowing you didn’t just poke holes hoping for the best.


No signals yet — transmit the first.