
If your garage looks like a staging area for chaos, you're not alone. I’ve been there—tools scattered, boxes stacked, and zero room for the car. After helping friends and tackling my own 1989 home’s garage, I’ve learned that good **garage organization systems** aren’t about buying the most expensive cabinets. They’re about scope, sequence, and spending the right money the first time. Follow the procedure and everything will be fine.
Define Your Scope and Budget First
Before you buy a single bracket, you need a plan. Start by deciding what the garage needs to hold: vehicles, yard tools, sports gear, holiday decorations, and workbench space? Write a list. Measure the walls and floor area. A typical two-car garage is about 20 by 20 feet, giving you 400 square feet to work with. For a complete **garage organization systems** installation, budget ranges from $500 (DIY slatwall and shelving) to $3,500 (custom modular cabinets with countertops). I tell homeowners to set aside $1,500 as a realistic middle-ground if you’re doing the work yourself.

Choose the Right System Components
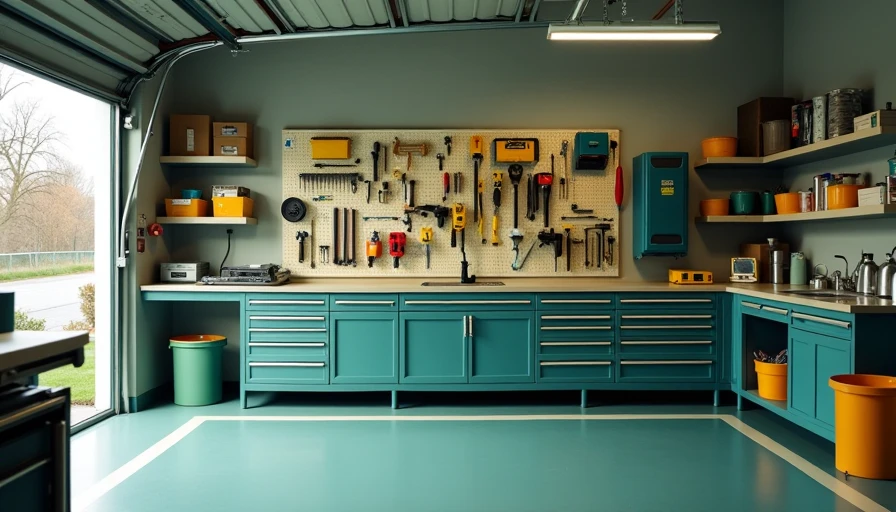
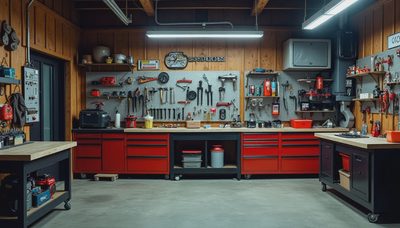
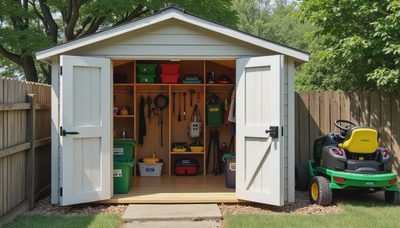
Not all **garage organization systems** are created equal. Slatwall panels are great for hanging tools and are easy to reconfigure. Heavy-duty shelving units (rated for 1,000+ pounds per shelf) handle totes and bins. Overhead storage racks free up floor space for seasonal items. For cabinets, look for 18-gauge steel or ⅝-inch plywood—anything thinner will sag. I prefer a mix: a 4x8 foot slatwall wall above a workbench, two 6-foot tall cabinets for chemicals and power tools, and overhead racks for camping gear. That combo gives you flexibility without overbuilding.
Install with the Right Sequence
Sequence matters more than you think. Start with the ceiling: install overhead racks first, because you’ll need clear floor space. Then do wall shelving and cabinets. Finally, tackle slatwall and pegboard. Why? Because you’ll be moving ladders and materials around, and you don’t want to damage new painted surfaces. When mounting cabinets, use 3-inch lag screws into studs—never drywall anchors alone for heavy loads. For overhead racks, follow the manufacturer’s weight limits and use at least four fasteners per corner. If you skip this step now, you may pay for it later when a shelf collapses.
Common Failure Modes and How to Avoid Them
The biggest mistake I see is buying cheap plastic shelving that bows under weight. Another is failing to plan for future needs—leaving no room for the kid’s bike that arrives next year. Also, ignoring ventilation: if you store paint or solvents, cabinets should have vents or be metal. Megan says I’m too rigid, but I’ve seen too many garages become unusable again within a year because the system wasn’t matched to actual usage. Budget for a dehumidifier if your garage is damp—moisture ruins cardboard boxes and rusts tools.
Maintenance Checklist for Long-Term Success
Once your **garage organization systems** are in place, they need occasional care. Every six months, go through bins and purge broken or unused items—stuff accumulates fast. Wipe down slatwall panels and cabinet doors with a damp cloth. Check that all fasteners are tight (wood screws loosen over time with temperature swings). Reorganize as your hobbies change: I recently moved my camping gear from shelves to an overhead rack to free up space for Chloe’s new scooter. The system is flexible if you designed it that way from the start.
Investing in quality **garage organization systems** pays off in time saved and frustration avoided. Take the time to scope, measure, and sequence your project. Whether you spend $500 or $3,000, the key is to think like a project manager. Follow the procedure, and your garage will stay organized for years.
Frequently Asked Questions About Garage Organization Systems
**Q: How much should I budget for a complete garage organization system?**
A: For a two-car garage, expect to spend $500–$1,500 on a DIY system using slatwall and heavy-duty shelving from brands like NewAge or Gladiator. If you hire a professional, costs jump to $2,000–$5,000 including custom cabinets and epoxy flooring.
**Q: Can I install garage organization systems myself?**
A: Yes, if you have basic tools and can handle a drill and level. The most challenging part is mounting overhead racks alone—enlist a helper. Allow a full weekend for the entire project.
**Q: What’s the most durable material for cabinets?**
A: 18-gauge welded steel is best for heavy tools and chemicals. For wood, choose ¾-inch plywood with a melamine coating—avoid particleboard, which sags in humidity.
**Q: Should I add epoxy floor coating before installing the system?**
A: It’s easier to coat the floor before you put in storage. But if your budget is tight, you can always install storage first and paint the floor later—just move everything outside for a day.
**Q: How do I plan for future storage needs?**
A: Leave 20% of your wall and floor space empty. Use modular systems like slatwall that let you reposition hooks and shelves easily. Also, choose cabinets with adjustable shelves. That way, when your kids acquire new bikes or you take up woodworking, you can adapt without a total overhaul.
By answering these common questions, you'll avoid costly mistakes and get the most out of your **garage organization systems**.

No signals yet — transmit the first.